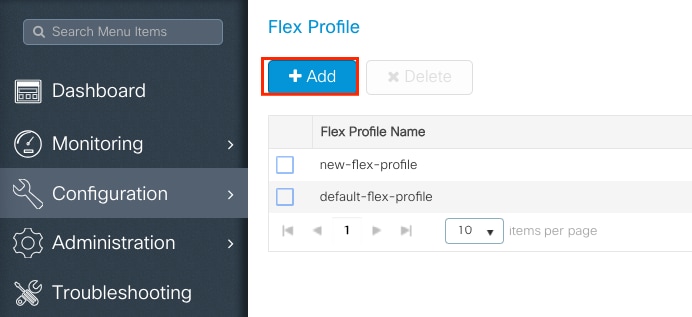
はじめに
このドキュメントでは、9800 ワイヤレスコントローラの FlexConnect 機能とその一般的な設定について説明します。
背景説明
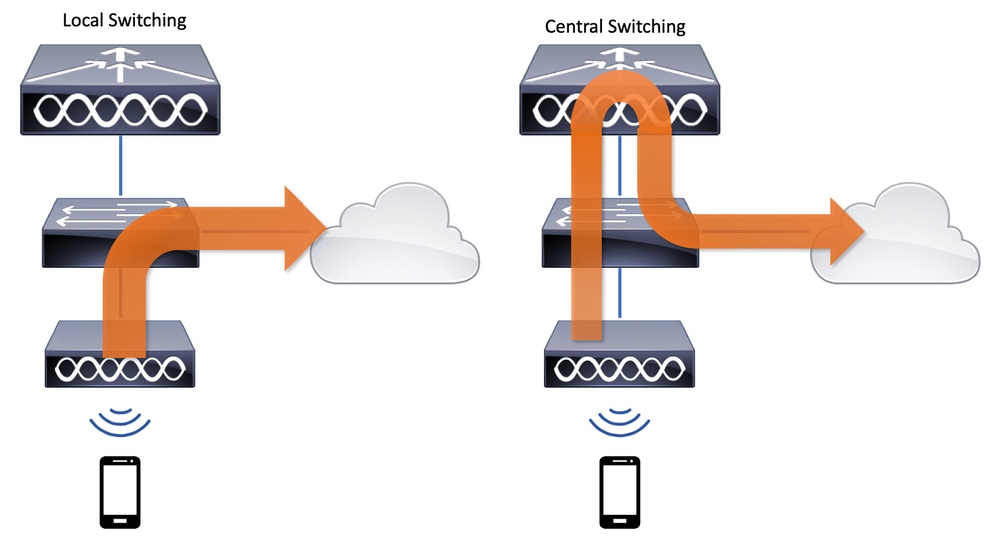
FlexConnect とは、ワイヤレスクライアントからのトラフィックを AP レベルでネットワークに直接ルーティングするか(ローカルスイッチング)、9800 コントローラに集中させるか(中央スイッチング)を決定するアクセスポイント(AP)の機能です。
前提条件
要件
このドキュメントに関する固有の要件はありません。
使用するコンポーネント
このドキュメントの情報は、次のソフトウェアとハードウェアのバージョンに基づいています。
- Cisco Catalyst 9800ワイヤレスコントローラとCisco IOS®-XE Gibraltar v17.9.x
このドキュメントの情報は、特定のラボ環境にあるデバイスに基づいて作成されました。このドキュメントで使用するすべてのデバイスは、クリアな(デフォルト)設定で作業を開始しています。本稼働中のネットワークでは、各コマンドによって起こる可能性がある影響を十分確認してください。
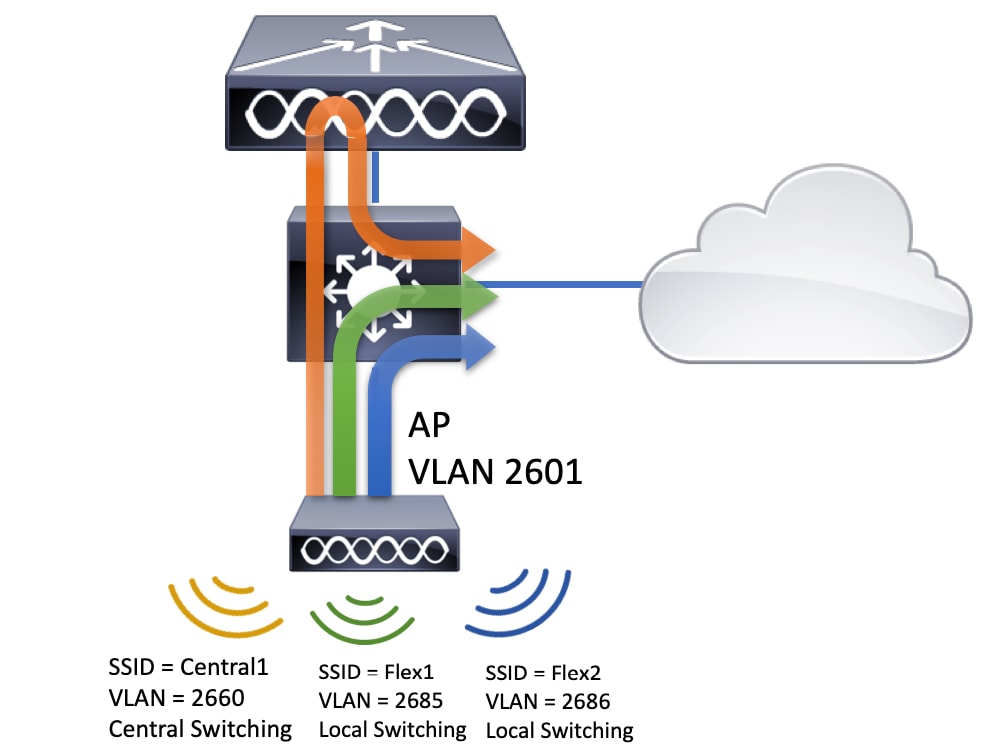
ネットワーク図
このドキュメントは、次のトポロジに基づいています。
コンフィギュレーション
次の図は、このドキュメントのシナリオを完了するために必要な設定を視覚的に配置したものです。
FlexConnect ローカル スイッチング サービスセット識別子(SSID)を設定するための一般的な手順は、次のとおりです。
- WLAN プロファイルの作成/変更
- ポリシープロファイルの作成/変更
- ポリシータグの作成/変更
- Flex プロファイルの作成/変更
- サイトタグの作成/変更
- AP へのポリシータグの割り当て
以下のセクションでは、それぞれの設定方法について順を追って説明します。
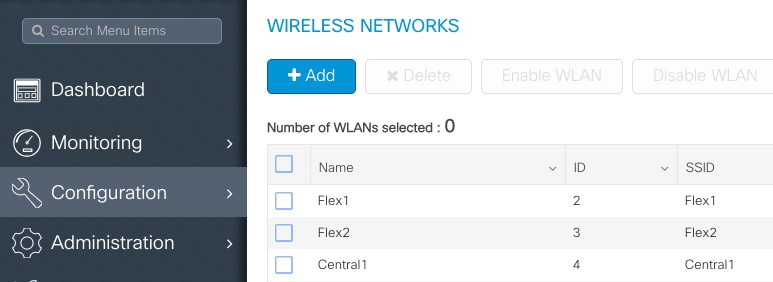
WLAN プロファイルの作成/変更
次の手順に従うと、3 つの SSID を作成できます。
「Create your SSID」
ポリシープロファイルの作成/変更
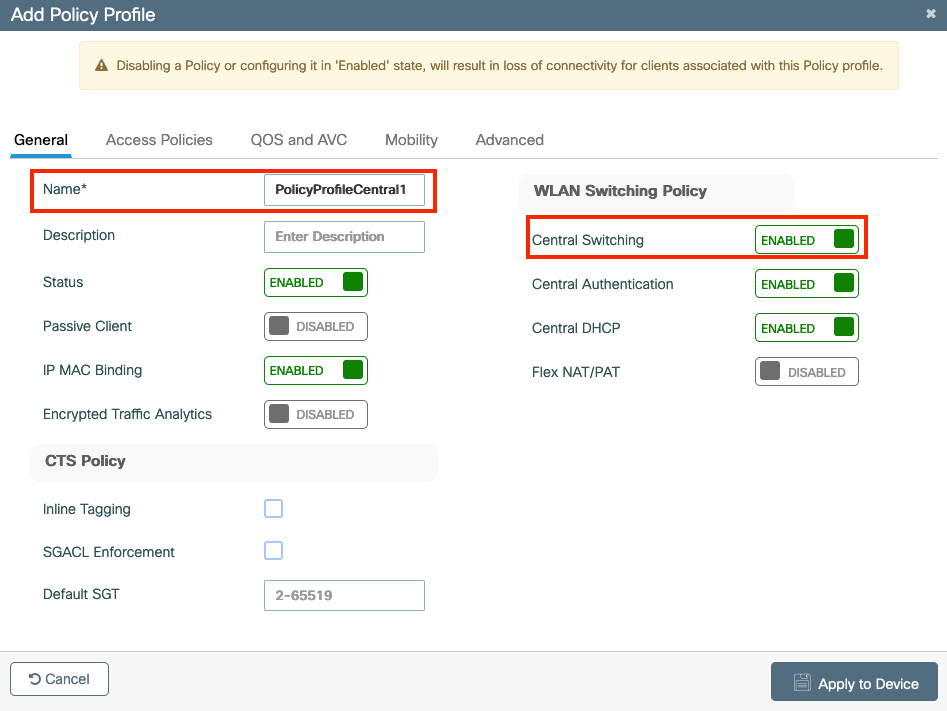
ステップ 1:Configuration > Tags & Profiles > Policyに移動します。既存のポリシーの名前を選択するか、[+追加(+ Add)] をクリックして新しいポリシーを追加します。
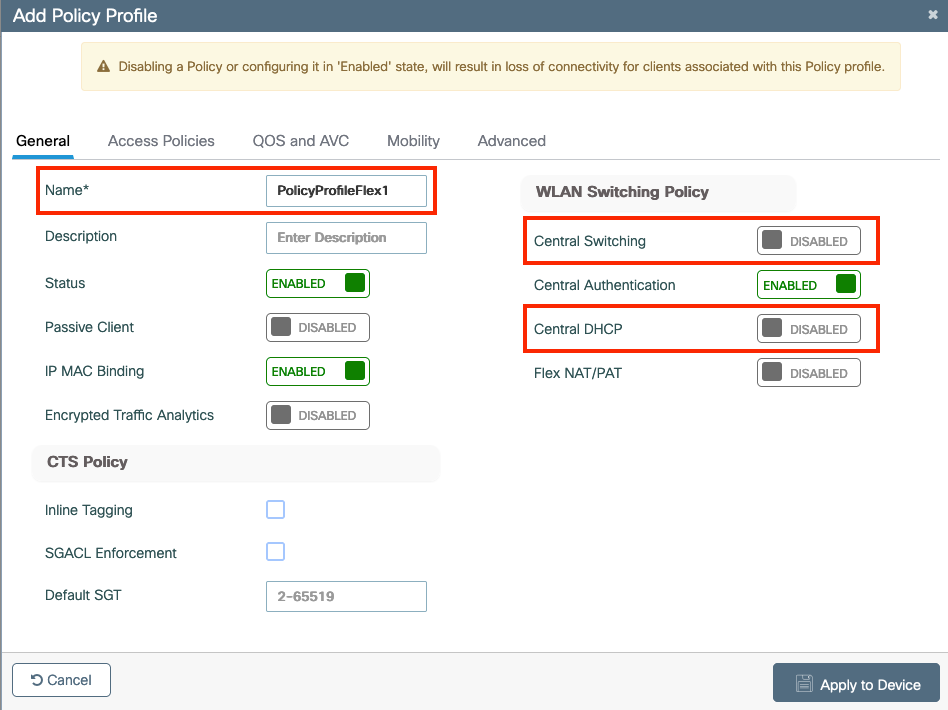 プロファイルFlex1
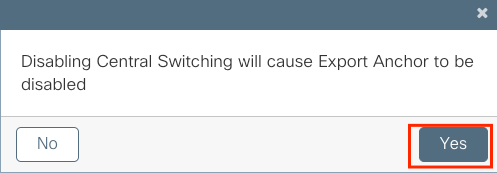
こCentral Switching の警告メッセージが表示されたら、をクリックしYes て設定を続行します。
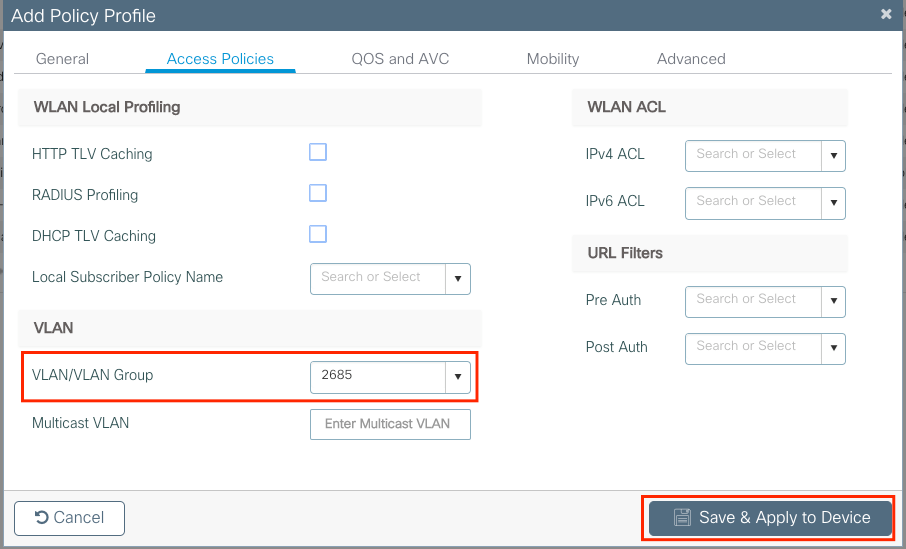
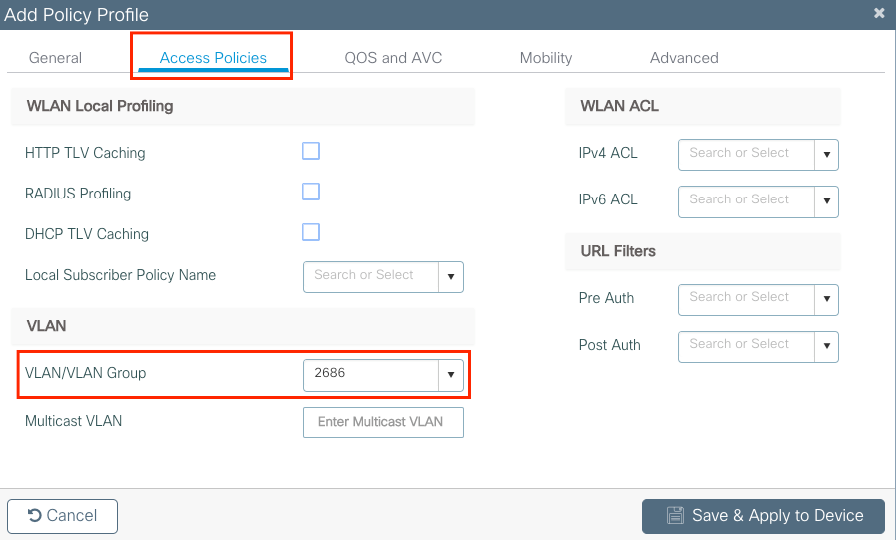
ステップ 2:Access Policies タブに移動し、VLANを入力します(このVLANは9800 WLCに存在しないため、ドロップダウンリストには表示されません)。その後、Save & Apply to Deviceをクリックします。
ステップ 3:PolicyProfileFlex2 について、同じ手順を繰り返します。
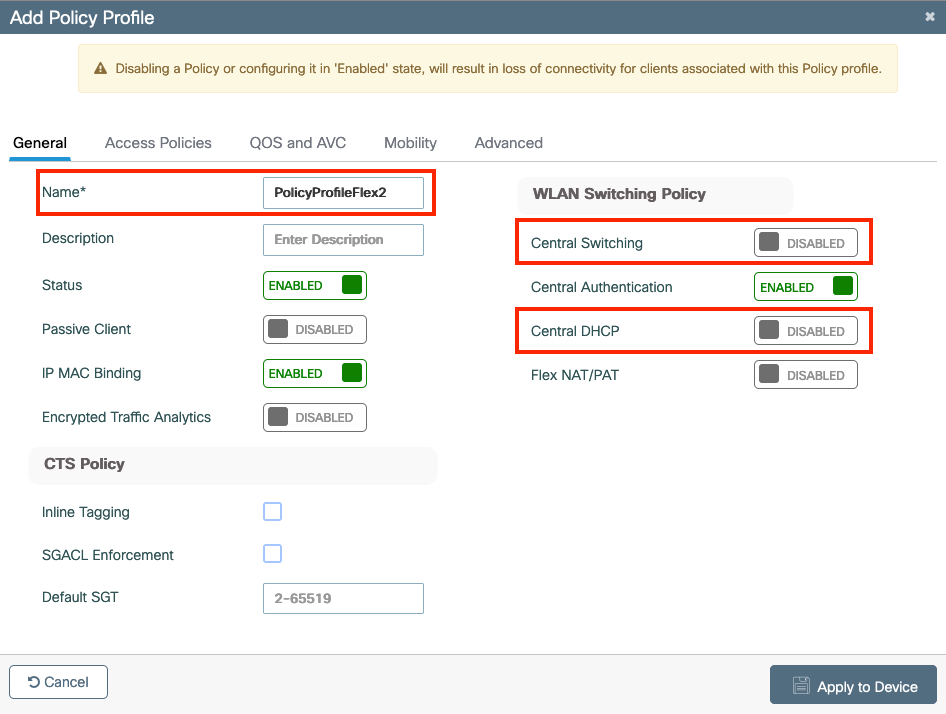 プロファイルFlex2
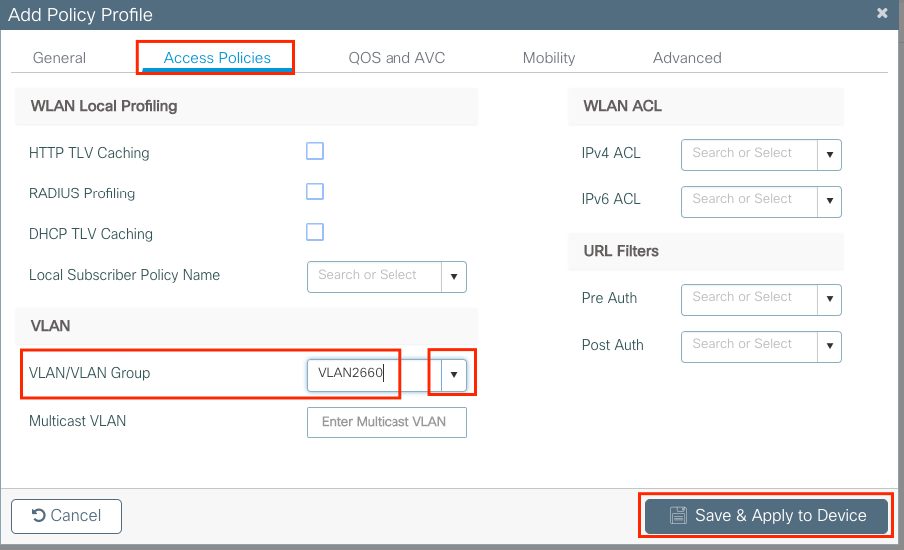
ステップ 4:中央でスイッチングされる SSID の場合、必要な VLAN が 9800 WLC に存在することを確認し、存在しない場合は作成します。
注:ローカルでスイッチングされる WLAN を持つ FlexConnect AP の場合は、トラフィックが AP でスイッチングされ、クライアントからの DHCP 要求は AP インターフェイスによって有線ネットワークに直接送信されます。AP ではクライアントサブネットに SVI がないため、DHCP プロキシを実行できません。そのため、[ポリシープロファイル(Policy Profile)] > [詳細設定(Advanced)] タブの DHCP リレー設定(DHCP サーバーの IP アドレス)は、ローカルでスイッチングされる WLAN については意味を持ちません。これらのシナリオでは、スイッチポートでクライアント VLAN を許可する必要があり、その場合、DHCP サーバーが別の VLAN にあるときは、クライアント SVI/デフォルトゲートウェイで IP ヘルパーを設定して、クライアントからの DHCP 要求の送信先を認識できるようにする必要があります。
クライアントの VLAN の宣言
ステップ 5:中央 SSID のポリシープロファイルを作成します。
Configuration > Tags & Profiles > Policyに移動します。既存の名前を選択するか、をクリックして新しい名前を追加します+ Add。
 縦断セントラル1
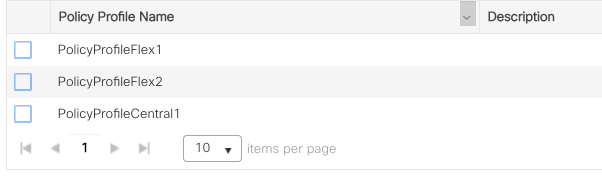
結果として、3 つのポリシープロファイルが存在します。
CLI:
# config t

# vlan 2660
# exit # wireless profile policy PolicyProfileFlex1 # no central switching # vlan 2685 # no shutdown # exit # wireless profile policy PolicyProfileFlex2 # no central switching # vlan 2686 # no shutdown # exit # wireless profile policy PolicyProfileCentral1 # vlan VLAN2660 # no shutdown # end
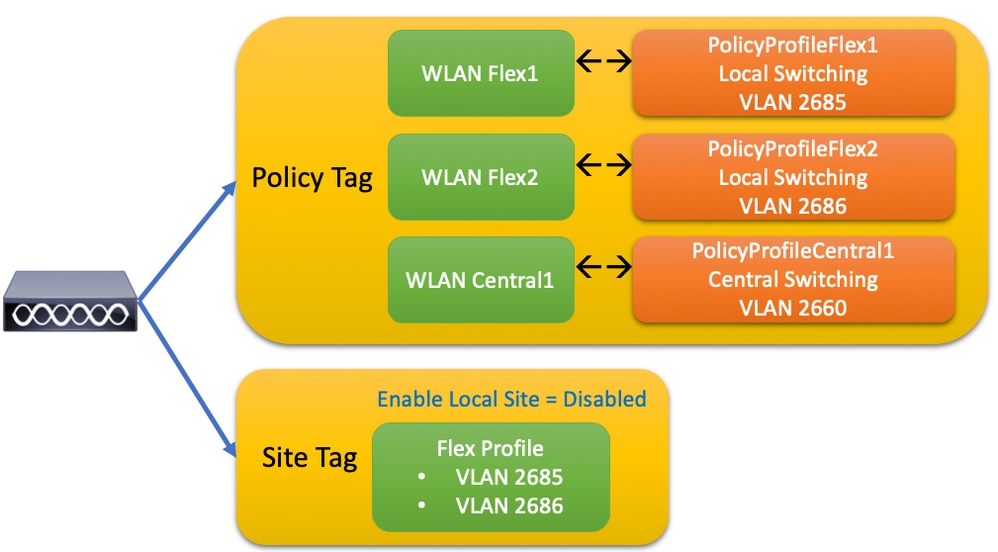
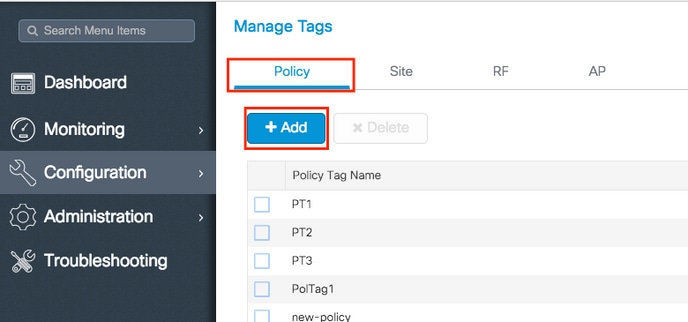
ポリシータグの作成/変更
ポリシータグは、どの SSID がどのポリシープロファイルに関連付けられるかを指定できる要素です。
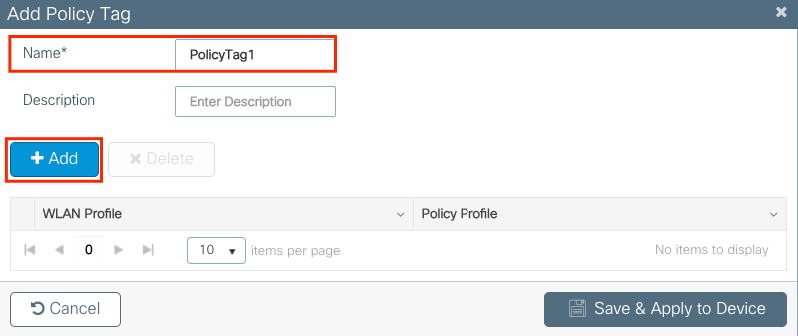
ステップ 1:Configuration > Tags & Profiles > Tags > Policyに移動します。 既存の名前を選択するか、をクリックして新しい名前を追加します+ Add。
ステップ 2:Policy Tag内で +Addをクリックし、ドロップダウンリストからPolicy Tagに追加する WLAN Profile 名前とリンクPolicy Profile する名前を選択します。その後、チェックマークをクリックします。
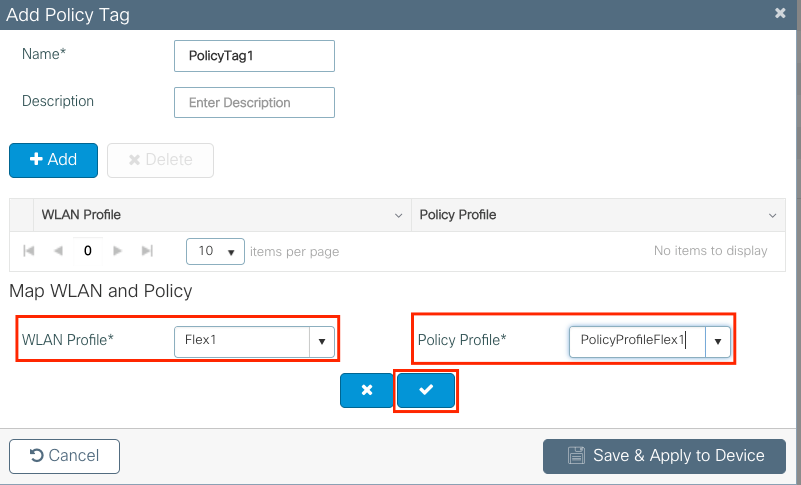
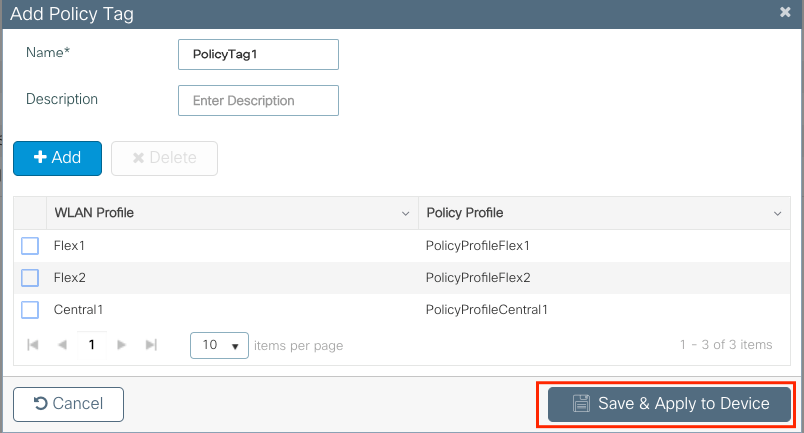
3つのSSIDに対してこの手順を繰り返し、続いてSave & Apply to Deviceをクリックします。
CLI:
# config t # wireless tag policy PolicyTag1 # wlan Flex1 policy PolicyProfileFlex1 # wlan Flex2 policy PolicyProfileFlex2 # wlan Central1 policy PolicyProfileCentral1 # end
Flex プロファイルの作成/変更
このドキュメントで使用されるトポロジでは、ローカルスイッチングに 2 つの異なる VLAN による 2 つの SSID があることに注意してください。 Flex プロファイルでは、AP の VLAN(ネイティブ VLAN)と、その AP が認識する必要のある他の VLAN(この場合は SSID によって使用される VLAN)を指定します。
ステップ 1:に移動しConfiguration > Tags & Profiles > Flex て新しいプロファイルを作成するか、既存のプロファイルを変更します。
ステップ 2:Flex プロファイルの名前を定義し、AP の VLAN(ネイティブ VLAN ID)を指定します。
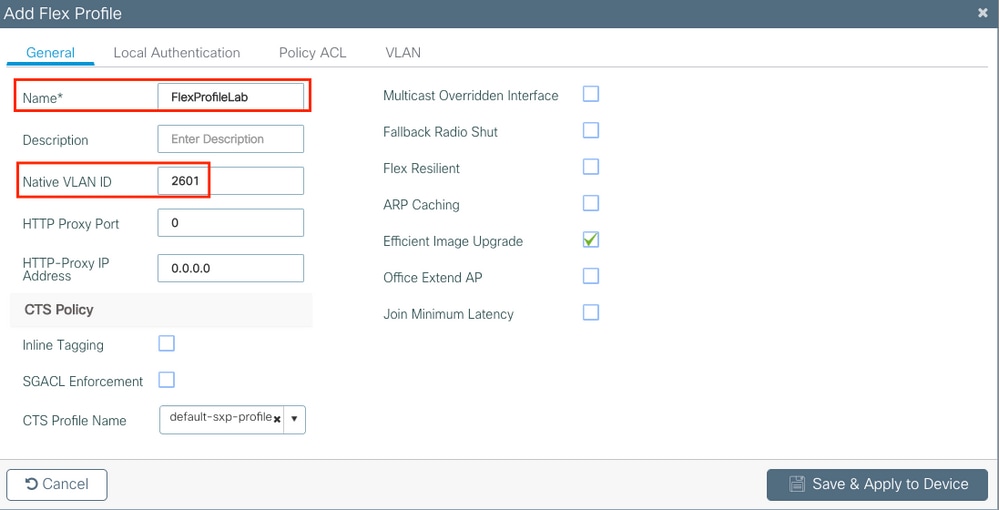
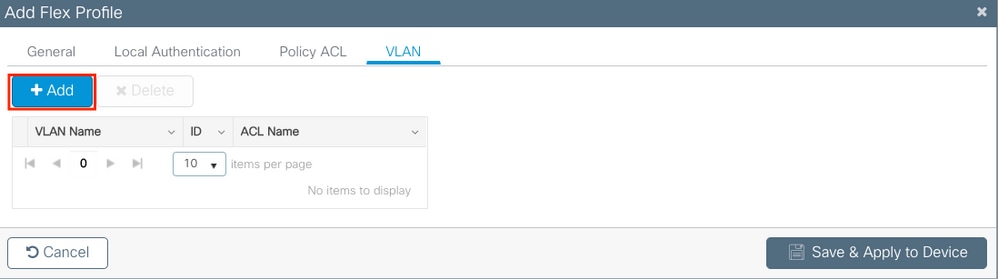
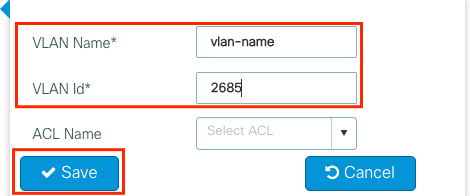
ステップ 3:VLAN タブに移動し、必要なVLANを指定します。
このシナリオでは、VLAN 2685 と VLAN 2686 にクライアントが存在します。これらの VLAN は 9800 WLC には存在しません。これらの VLAN を Flex プロファイルに追加して AP に存在させます。
注:ポリシープロファイルを作成したときに VLAN ID ではなく VLAN 名を選択した場合は、Flex プロファイルでの VLAN 名がまったく同じであることを確認してください。
必要な VLAN について、同じ手順を繰り返します。
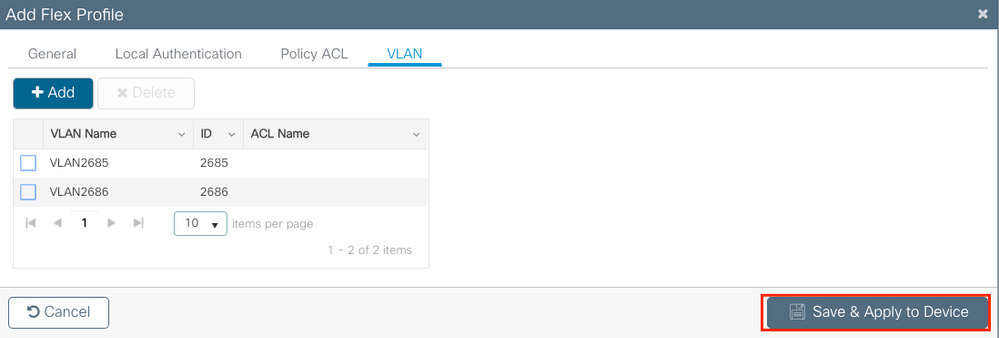
中央スイッチングに使用される VLAN は、AP がそれを認識する必要がないため、追加されていないことに注意してください。
CLI:
# config t
 # wireless profile flex FlexProfileLab # native-vlan-id 2601 # vlan-name VLAN2685 # vlan-id 2685 # vlan-name VLAN2686 # vlan-id 2686 # end
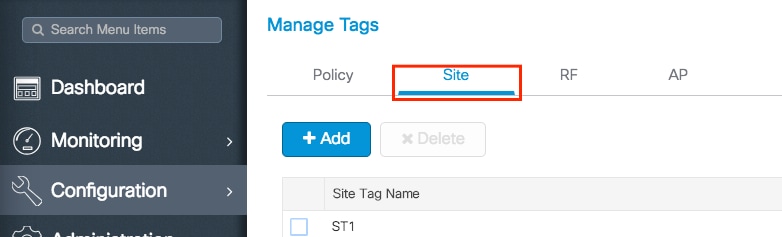
サイトタグの作成/変更
サイトタグは、AP に割り当てられる AP Join または Flex プロファイルを指定できる要素です。
ステップ 1: Configuration > Tags & Profiles > Tags > Siteに移動します。 既存の名前を選択するか、をクリックして新しい名前を追加します+ Add。
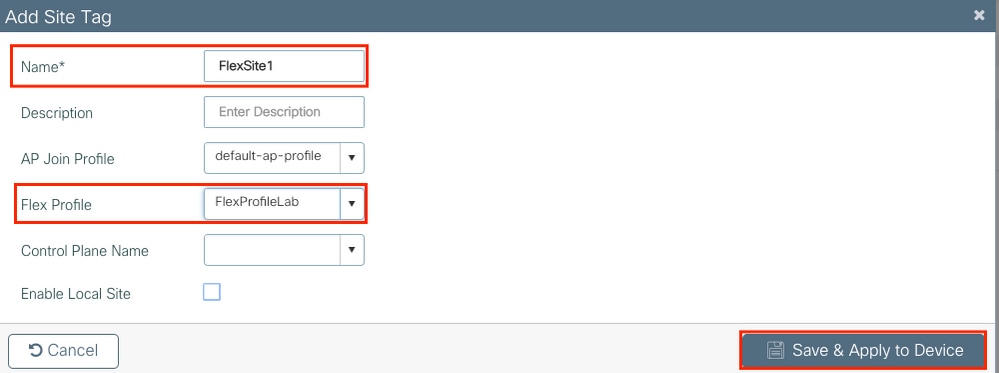
ステップ 2:Site Tag内で、Enable Local Site オプションを無効にします(オプションが無効なSite Tagを受信するAPは、FlexConnectモEnable Local Site ードに変換されます)。ディセーブルにすると、Flex Profileも選択できます。その後、Save & Apply to Deviceをクリックします。
CLI:
# config t # wireless tag site FlexSite1
# flex-profile FlexProfileLab
# no local-site
AP へのポリシータグの割り当て
ポリシータグを AP に直接割り当てるか、同じポリシータグを AP のグループに同時に割り当てることができます。どちらでも自由に選択できます。
AP ごとのポリシータグの割り当て
Configuration > Wireless > Access Points > AP name > General > Tagsに移動します。ドロSite ップダウンリストから目的のタグを選択し、Update & Apply to Deviceをクリックします。
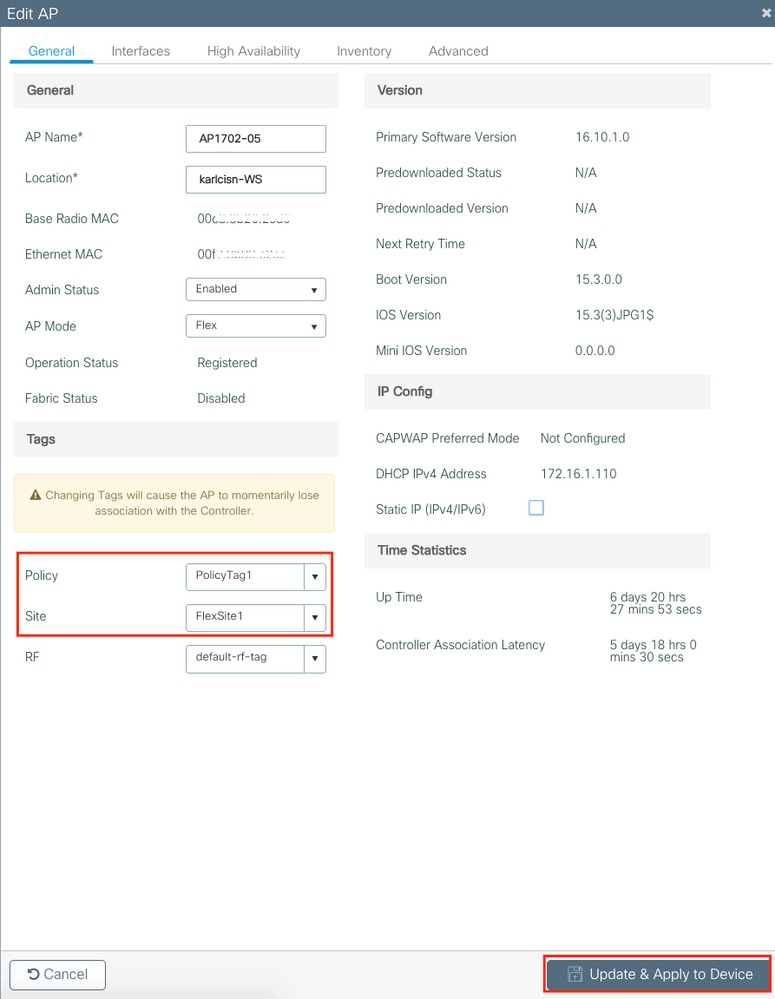
注:AP でポリシータグを変更すると、9800 WLC への関連付けが失われ、約 1 分以内に再参加することに注意してください。
注:APがローカルモード(または他のモード)に設定されていて、Enable Local Site のオプションが無効になっているサイトタグを取得する場合、APはリブートし、FlexConnectモードに戻ります。
CLI:
# config t # ap <ethernet-mac-addr> # site-tag <site-tag-name> # end
複数の AP へのポリシータグの割り当て
Configuration > Wireless Setup > Advanced > Start Nowに移動します。
Tag APs :=アイコンをクリックし、その後、タグを割り当てるAPのリストを選択します(APのリストをフィルタリングするには、AP name [または他のフィールド]の横にある下向き矢印をクリックします)。
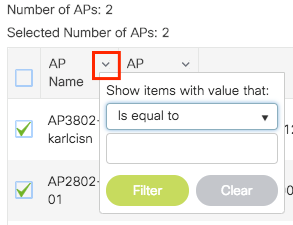
目的の AP を選択したら、[+ APのタグ付け(+ Tag APs)] をクリックします。
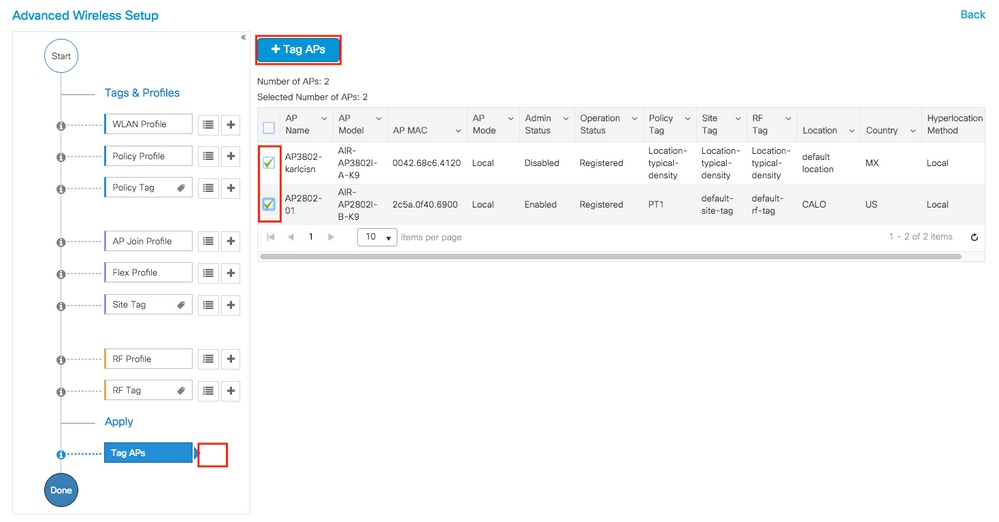
APに割り当てるタグを選択して、Save & Apply to Deviceをクリックします。

注:AP でポリシータグを変更すると、9800 WLC への関連付けが失われ、約 1 分以内に再参加することに注意してください。
注:APがローカルモード(または他のモード)に設定されていて、Enable Local Site のオプションが無効になっているサイトタグを取得した場合、APはリブートし、FlexConnectモードに戻ります。
CLI:
同じタグを複数の AP に割り当てる CLI オプションはありません。
FlexConnect ACL
ローカルでスイッチされる WLAN がある場合は、ACL をクライアントに適用する方法を考慮する必要があります。
中央でスイッチされる WLAN の場合、すべてのトラフィックは WLC で解放されるため、ACL を AP にプッシュする必要はありません。しかし、トラフィックがローカルでスイッチされる場合(Flex Connect:ローカルスイッチング)、トラフィックは AP で解放されるため、ACL(コントローラで定義)を AP にプッシュする必要があります。これは、ACL を Flex プロファイルに追加するときに実行されます。
FlexConnect ACLは、出力方向と入力方向の両方に適用されます。これには、クライアントサブネットのトラフィックを許可または拒否する際に明確に指定する必要があります。ACLを十分に明示的に指定せずにクライアントがゲートウェイにアクセスするのをブロックするのは、一般的な誤りです。詳細は、Cisco Bug ID CSCuv93592のノートを参照してください 。
。
中央でスイッチされる WLAN
中央でスイッチされる WLAN に接続されているクライアントに ACL を適用するには、次の手順を実行します。
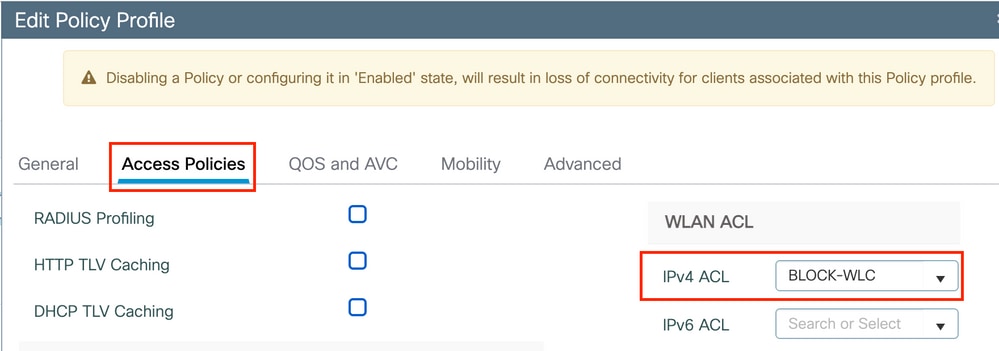
手順 1:ACL をポリシープロファイルに適用します。[設定(Configuration)] > [タグとプロファイル(Tags & Profiles)] > [ポリシー(Policy)] の順に選択し、中央でスイッチされる WLAN に関連付けられているポリシープロファイルを選択します。[アクセスポリシー(Access Policies)] > [WLAN ACL] セクションで、クライアントに適用する ACL を選択します。
中央でスイッチングされるWLANに中央Web認証を設定する場合、APがローカルモードであるかのように、9800にリダイレクトACLを作成できます。これは、この場合すべてがWLCで一元的に処理されるためです。
ローカルでスイッチされる WLAN
ローカルでスイッチされる WLAN に接続されているクライアントに ACL を適用するには、次の手順を実行します。
手順 1:ACL をポリシープロファイルに適用します。[設定(Configuration)] > [タグとプロファイル(Tags & Profiles)] > [ポリシー(Policy)] の順に選択し、中央でスイッチされる WLAN に関連付けられているポリシープロファイルを選択します。[アクセスポリシー(Access Policies)] > [WLAN ACL] セクションで、クライアントに適用する ACL を選択します。

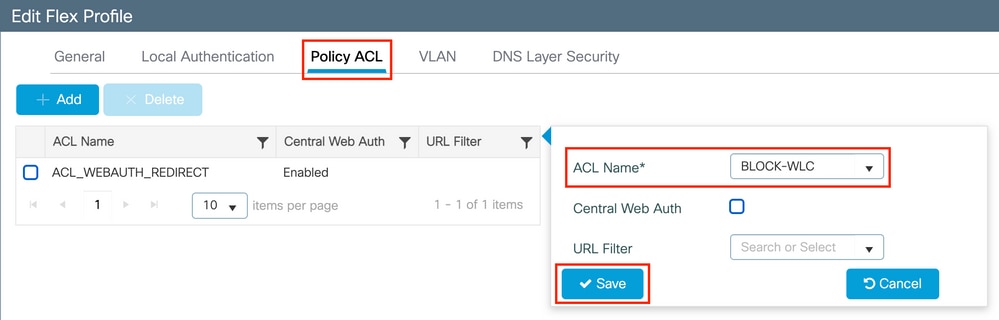
手順 2:ACL を Flex プロファイルに適用します。[設定(Configuration)] > [タグとプロファイル(Tags & Profiles)] > [Flex] に移動し、Flex Connect AP に割り当てられている Flex プロファイルを選択します。[ポリシー ACL(Policy ACL)] セクションで、ACL を追加し、[保存(Save)] をクリックします。
ACL が適用されているかどうかの確認
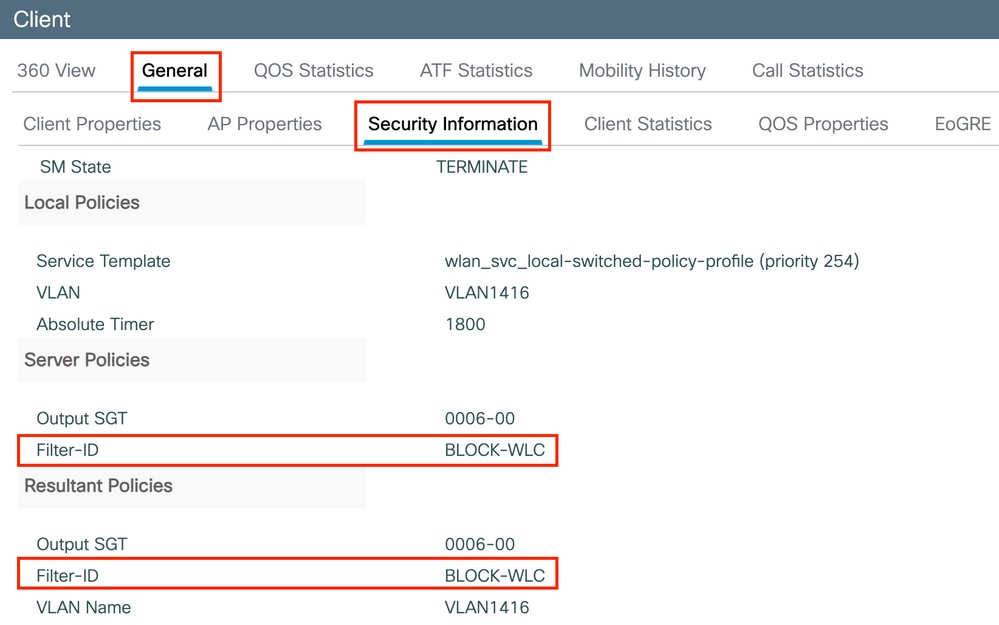
ACL がクライアントに適用されているかどうかを確認するには、[モニタリング(Monitoring)] > [ワイヤレス(Wireless)] > [クライアント(Clients)] の順に選択し、確認するクライアントを選択します。[全般(General)] > [セキュリティ情報(Security Information)] セクションで、[サーバーポリシー(Server Policies)] セクションの「Filter-ID」の名前を確認します。これが、適用される ACL に対応している必要があります。
Flex Connect(ローカルスイッチング)AP の場合、その AP 自体で「#show ip access-lists」コマンドを入力することにより、ACL が AP に接続されているかどうかを確認できます。
検証
以下のコマンドを使用すると設定を確認できます。
VLAN/インターフェイス設定
# show vlan brief # show interfaces trunk
# show run interface <interface-id>
WLAN 設定
# show wlan summary
# show run wlan [wlan-name] # show wlan { id <wlan-id> | name <wlan-name> | all }
AP の設定
# show ap summary # show ap tag summary # show ap name <ap-name> tag { info | detail }
# show ap name <ap-name> tag detail
 AP Name : AP2802-01 AP Mac : 0896.ad9d.143e Tag Type Tag Name ----------------------------- Policy Tag PT1 RF Tag default-rf-tag Site Tag default-site-tag Policy tag mapping ------------------ WLAN Profile Name Policy Name VLAN Central Switching IPv4 ACL IPv6 ACL ----------------------------------------------------------------------------------------------------------------------------------------------------------------------------------------------------- psk-pbl-ewlc ctrl-vl2602 VLAN0210 ENABLED Not Configured Not Configured Site tag mapping ---------------- Flex Profile : default-flex-profile AP Profile : default-ap-profile Local-site : Yes RF tag mapping -------------- 5ghz RF Policy : Global Config 2.4ghz RF Policy : Global Config
タグ設定
# show wireless tag { policy | rf | site } summary # show wireless tag { policy | rf | site } detailed <tag-name>
プロファイル設定
# show wireless profile { flex | policy } summary
# show wireless profile { flex | policy } detailed <profile-name> # show ap profile <AP-join-profile-name> detailed
 フィードバック