Gagnez du temps en lançant votre prochain projet IT avec Cisco Business Dashboard et Network Plug and Play
Objectif
Lancez rapidement et facilement une nouvelle infrastructure informatique à l'aide de Cisco Business Dashboard pour rechercher et provisionner automatiquement de nouveaux périphériques. La fonctionnalité Network Plug & Play (Network Plug & Play) sous-tend le déploiement sans intervention de Cisco. Le tableau de bord Cisco Business Dashboard est équipé d'un PnP réseau.
Logiciel applicable | Version
- Tableau de bord Cisco Business | 2.2
Pour obtenir une liste détaillée des clients et des périphériques pris en charge, cliquez ici.
Quel problème le protocole PnP du réseau résout-il ?
Le PnP réseau supprime une grande partie du travail nécessaire au déploiement de nouvelles infrastructures informatiques. Du provisionnement à la découverte de périphériques, vous pouvez gérer le déploiement de votre réseau à partir d'une interface distante avec des options d'accès personnalisables. Sans PnP réseau, les techniciens réseau doivent déballer et configurer les périphériques un par un. Désormais, vous pouvez provisionner le micrologiciel ou mettre à jour la configuration initiale des périphériques de votre projet.
Comment fonctionne le réseau PnP ?
Les périphériques qui prennent en charge cette fonctionnalité peuvent se connecter au serveur PnP du réseau. Lorsque le périphérique se connecte au serveur PnP du réseau, il est identifié par une série de règles et stocké dans une liste de périphériques compatibles PnP. Les périphériques sont provisionnés en fonction de la précision de la méthode utilisée pour correspondre à ce périphérique. Il existe quatre façons pour un périphérique compatible PnP de découvrir l'adresse sur le serveur PnP réseau, qui est le tableau de bord Cisco Business. Les quatre méthodes de détection sont la configuration manuelle, DHCP, DNS et Plug and Play Connect Service.
PnP peut fonctionner sans utiliser la détection DHCP. Cependant, si vous voulez que le périphérique compatible PnP découvre l'adresse du serveur PnP via DHCP, le périphérique doit se connecter au serveur DHCP avec un indicateur d'option 60. Cet indicateur d'option 60 contient une chaîne « ciscopnp » indiquant la demande du périphérique pour l'adresse du serveur PnP réseau. Lorsque le serveur DHCP reçoit l'indicateur d'option 60, il répond en nature avec une balise d'option 43 qui inclut l'adresse complète du serveur PnP du réseau. Pour en savoir plus sur la configuration de PnP sur un commutateur, cliquez ici.
Ok, je suis prêt à commencer, qu'est-ce qui va suivre ?
Bien que votre premier besoin soit de commencer à ajouter des périphériques, cliquez sur Images ou Configurations à la place. Les options que vous choisissez dépendent des besoins de votre réseau. Ce guide couvre les deux exemples.
Étape 1
Connectez-vous à l'interface utilisateur de Cisco Business Dashboard Administration.
Étape 2
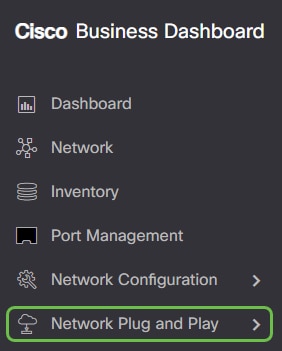
Cliquez sur le bouton menu.

Étape 3
Cliquez sur le bouton Network Plug and Play.
Étape 4
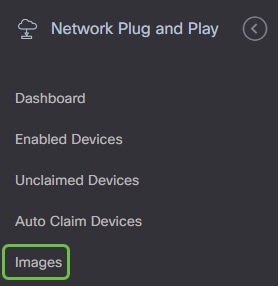
Cliquez sur le bouton Images.
Étape 5
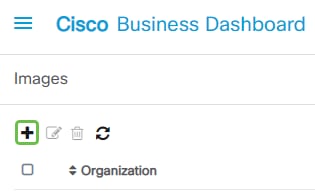
Cliquez sur l'icône plus.
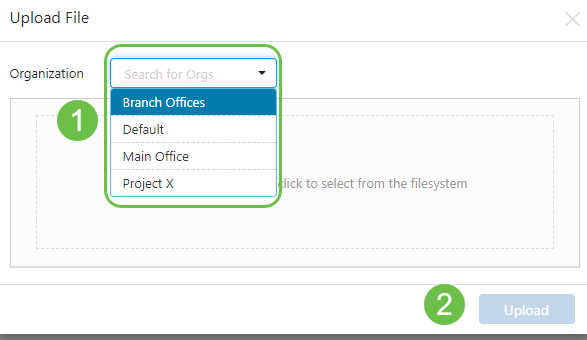
Étape 6
Si vous avez plusieurs organisations, vous devez cliquer sur la flèche de la liste déroulante pour sélectionner l'organisation appropriée. Cette image ne sera affichée que pour les périphériques de cette organisation.
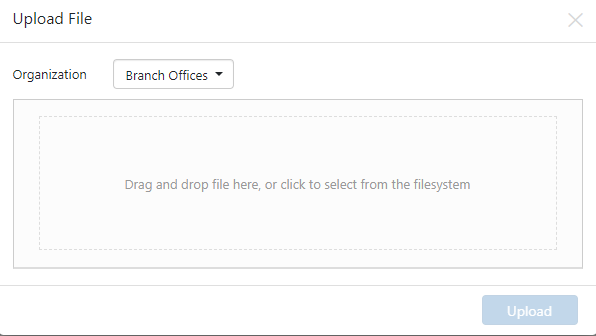
Étape 7
À ce stade, le tableau de bord affiche un écran vous demandant de faire glisser un fichier dans la zone ou de cliquer dans la zone pour ouvrir une boîte de dialogue de téléchargement de fichier dans le navigateur. Sélectionnez le fichier souhaité et cliquez sur le bouton Télécharger.
Pour en savoir plus sur les modèles, cliquez sur l'article Modèles de configuration Plug-and-Play.
N'oubliez pas que le tableau de bord Cisco Business n'accepte qu'un type de fichier particulier. Dans le cas des images de microprogramme, un fichier Firmware_File.Bin. La fonction de fichier de configuration accepte Config_File.XML ou Config_File.TXT.
Étape 8
Répétez les étapes pour ajouter les fichiers de configuration ou d'image si nécessaire. Le bouton de section Configurations se trouve immédiatement sous le bouton Images.

Les configurations appliquées aux périphériques sont destinées au démarrage et ne sont pas en cours d'exécution.
Des chemins différents, en fonction de vos besoins
Méthode manuelle : Sélectionnez cette option pour contrôler la configuration et l'image de chaque périphérique.
Méthode de demande automatique : Sélectionnez cette option si vous souhaitez provisionner des périphériques uniquement en fonction de l'ID de produit. C'est une option simple.
Ignorer: Sélectionnez cette option pour avertir le PnP du réseau que vous allez gérer toutes les installations de configuration ou de microprogramme.
Le facteur déterminant est la précision dont vous avez besoin pour contrôler les options de provisionnement, par périphérique individuel ou par catégorie de périphérique.
| Méthode | Précision de provisionnement | Informations requises |
| Manuel | Faible | S/O |
| Demande automatique | Moyen | PID |
| Ignorer | Très élevé* | S/O |
À ce stade, le chemin que vous empruntez dépend de vos besoins pour ce projet. Si vous avez l'intention d'utiliser la méthode de demande automatique, poursuivez la lecture. Vous pouvez également accéder à la section Revendication manuelle ou Ignorer les périphériques.
Utilisation de la méthode de demande automatique
Pensez à la demande automatique comme une fonction basée sur un filtre ; pour que les périphériques soient migrés dynamiquement vers votre projet, vous devez confirmer les ID de produit (PID) destinés au projet. Ensuite, Network PnP recherche le PID correspondant et ajoute à sa liste des périphériques compatibles PnP.
Étape 1
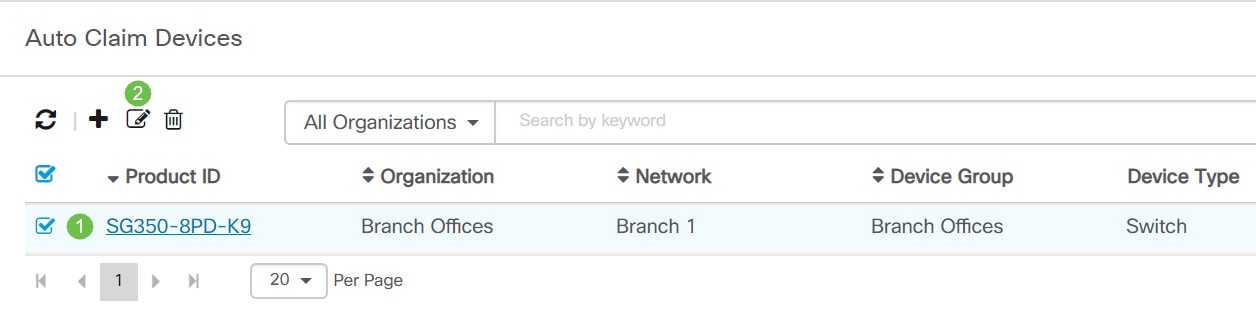
Commencez ce processus en cliquant sur Périphériques de demande automatique.

Étape 2
Cliquez sur l'icône plus.

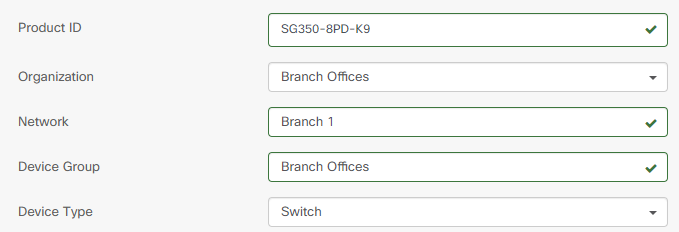
Étape 3
Saisissez l'ID de produit, l'organisation, le réseau, le groupe de périphériques et le type de périphérique pour les périphériques que vous souhaitez récupérer automatiquement.
Étape 4
Cliquez sur Next (Suivant).
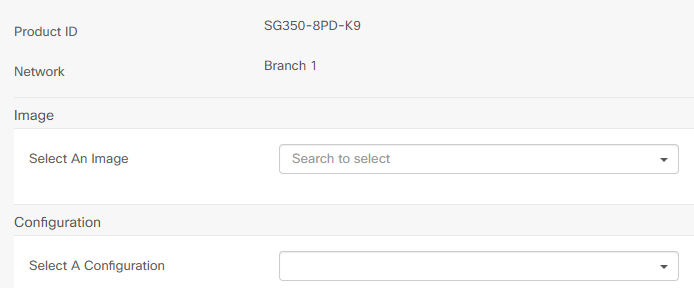
Étape 5
Sélectionnez le micrologiciel et la configuration souhaités dans les zones déroulantes.
Étape 6
Cliquez sur Finish.
Une fois cette action terminée, le serveur Plug-and-Play de réseau utilise l'image et la configuration pour provisionner tout périphérique se connectant au réseau et correspondant à ce PID.
Étape 7
Sinon, si vous souhaitez modifier un périphérique de demande automatique, cochez la case en regard du périphérique, puis l'icône de modification.
Réclamer ou ignorer manuellement des périphériques
Les périphériques qui ne correspondent pas à votre filtre mais qui prennent toujours en charge le PnP du réseau s'affichent dans la section Unprétendus Devices du PnP du réseau uniquement s'il s'agit d'un périphérique qui ne figure pas déjà dans l'inventaire CBD.
Étape 1
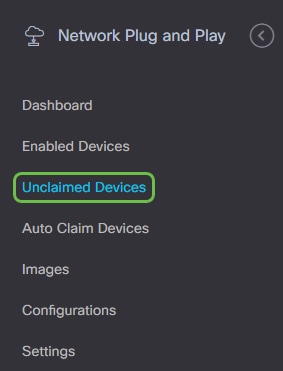
Dans le volet de navigation Plug-and-Play réseau, cliquez sur Unprétented Devices.
Étape 2
Sélectionnez un périphérique répertorié, puis cliquez sur Revendication ou Ignorer.
Le fait d'ignorer les périphériques empêche le serveur PnP du réseau de provisionner les périphériques à l'aide de configurations ou de microprogrammes. Cette option s'adresse à ceux qui souhaitent mettre à jour manuellement les configurations et le micrologiciel sur chaque périphérique. Lorsque des périphériques sont ajoutés à la liste des ignorés, ils ne sont pas touchés par le PnP réseau.

Étape 3
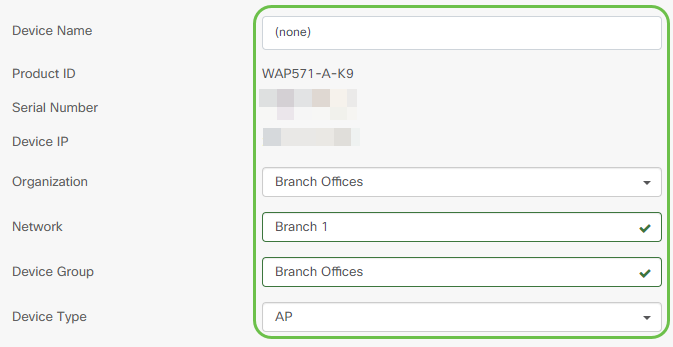
Si vous sélectionnez Revendication, renseignez les informations suivantes.
Étape 4
Cliquez sur Next (Suivant).
Étape 5
Sélectionnez le micrologiciel et la configuration souhaités dans les zones déroulantes.

Étape 6
Cliquez sur Next (Suivant).
Étape 7
Une page récapitulative s'affiche pour ce périphérique. Cliquez sur Finish.
Prenez un café ou un thé et faites une pause, vous venez d'ignorer ou revendiquer votre ou vos appareils sélectionnés.
Quand vos périphériques doivent-ils se reconnecter pour les mises à jour ?
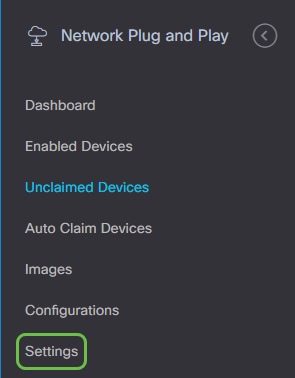
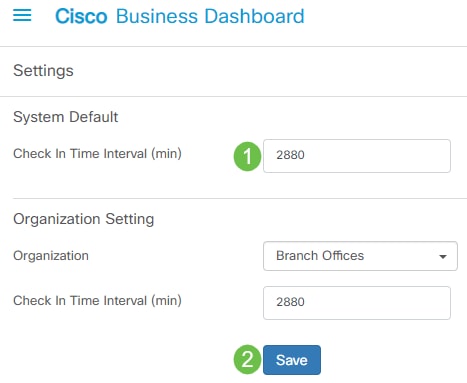
Vous pouvez modifier la durée avant que vos périphériques ne se réenregistrent pour les mises à jour. Sous Plug and Play, sélectionnez Settings.
Vous pouvez modifier la fréquence à laquelle le périphérique recherche les mises à jour dans les limites. 0 n'est pas accepté. 2880 est la durée maximale. Cliquez sur Enregistrer une fois que vous avez entré un nouvel intervalle de temps.
Conclusion
Félicitations, vous êtes maintenant prêt à passer de vos projets à venir du concept à l'exécution plus rapidement qu'auparavant. Pour en savoir plus sur Cisco Business Dashboard, consultez la page d'assistance CBD.
Pour en savoir plus sur Plug and Play, consultez le Guide de la solution Network Plug and Play pour Cisco Business.
 Commentaires
Contacter Cisco
- Ouvrir un dossier d’assistance

- (Un contrat de service de Cisco est requis)