Secure JMX Communication Between CVP OAMP and CVP Components with Mutual Authentication
Available Languages
Download Options
Bias-Free Language
The documentation set for this product strives to use bias-free language. For the purposes of this documentation set, bias-free is defined as language that does not imply discrimination based on age, disability, gender, racial identity, ethnic identity, sexual orientation, socioeconomic status, and intersectionality. Exceptions may be present in the documentation due to language that is hardcoded in the user interfaces of the product software, language used based on RFP documentation, or language that is used by a referenced third-party product. Learn more about how Cisco is using Inclusive Language.
Contents
Introduction
This document describes how to secure Java Management Extensions (JMX) communication between Customer Voice Portal (CVP) Operation and Management Console (OAMP) and CVP Server and CVP Reporting server in Cisco Unified Contact Center Enterprise (UCCE) solution via Certificate Authority (CA) signed certificates.
Prerequisites
Requirements
Cisco recommends that you have knowledge of these topics:
- UCCE Release 12.5(1)
- Customer Voice Portal (CVP) Release 12.5 (1)
Components Used
The information in this document is based on these software versions:
- UCCE 12.5(1)
- CVP 12.5(1)
The information in this document was created from the devices in a specific lab environment. All of the devices used in this document started with a cleared (default) configuration. If your network is live, make sure that you understand the potential impact of any command.
Background Information
OAMP communicates with CVP Call Server, CVP VXML Server, and CVP Reporting Server via JMX protocol. Secure communication between OAMP and these CVP components prevents JMX security vulnerabilities. This secure communication is optional, it is not required for the regular operation between OAMP and the CVP components.
You can secure JMX communication by:
- Generate the Certificate Sign Request (CSR) for Web Service Manager (WSM) in CVP Server and CVP Reporting Server.
- Generate CSR Client Certificate for WSM in CVP Server and CVP Reporting Server.
- Generate CSR Client Certificate for OAMP (to be done on OAMP).
- Sign the certificates by a Certificate Authority.
- Import the CA-signed certificates, Root and Intermediate in CVP Server, CVP Reporting Server and OAMP.
- [Optional] Secure JConsole Login to OAMP.
- Secure System CLI.
Generate CSR Certificates for WSM
Step 1. Log in to the CVP Server or Reporting Server. Retrieve the keystore password from the security.properties file.
Note: At the command prompt, enter more %CVP_HOME%\conf\security.properties. Security.keystorePW = <Returns the keystore password> Enter the keystore password when prompted.
Step 2. Navigate to %CVP_HOME%\conf\security and delete the WSM certificate. Use this command.
%CVP_HOME%\jre\bin\keytool.exe -storetype JCEKS -keystore %CVP_HOME%\conf\security\.keystore -delete -alias wsm_certificate.
Enter the keystore password when prompted.
Step 3. Repeat Step 2 for Call Server and VXML Server certificates on the CVP Server and Call Server Certificate on the Reporting Server.
Step 4. Generate a CA-signed certificate for WSM server. Use this command:
%CVP_HOME%\jre\bin\keytool.exe -storetype JCEKS -keystore %CVP_HOME%\conf\security\.keystore -genkeypair -alias wsm_certificate -v -keysize 2048 -keyalg RSA.
- Enter the details at the prompts and type Yes to confirm.
- Enter the keystore password when prompted.
Note: Note the CN name for future reference.
Step 5. Generate the certificate request for the alias. Run this command and save it to a file (for example, wsm.csr😞
%CVP_HOME%\jre\bin\keytool.exe -storetype JCEKS -keystore %CVP_HOME%\conf\security\.keystore -certreq -alias wsm_certificate -file %CVP_HOME%\conf\security\wsm.csr.
1. Enter the keystore password when prompted.
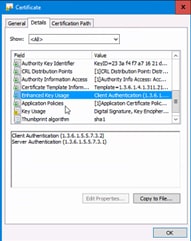
Step 6. Get the certificate signed by a CA. Follow the procedure to create a CA-signed certificate with the CA authority and ensure to use a Client-Server Certificate Authentication template when the CA generate the signed certificate.
Step 7. Download the signed certificate, the root and intermediate certificate of the CA authority.
Step 8. Copy the root, intermediate, and the CA-signed WSM certificate to %CVP_HOME%\conf\security\.
Step 9. Import the root certificate with this command.
%CVP_HOME%\jre\bin\keytool.exe -storetype JCEKS -keystore %CVP_HOME%\conf\security\.keystore -import -v -trustcacerts -alias root -file %CVP_HOME%\conf\security\<filename_of_root_cer>.
- Enter the keystore password when prompted.
- At Trust this certificate prompt, type Yes.
Step 10. Import the intermediate certificate with this command.
%CVP_HOME%\jre\bin\keytool.exe -storetype JCEKS -keystore %CVP_HOME%\conf\security\.keystore -import -v -trustcacerts -alias intermediate -file %CVP_HOME%\conf\security\<filename_of_intermediate_cer>.
- Enter the keystore password when prompted.
- At Trust this certificate prompt, type Yes.
Step 11. Import the CA-signed WSM certificate with this command.
%CVP_HOME%\jre\bin\keytool.exe -storetype JCEKS -keystore %CVP_HOME%\conf\security\.keystore -import -v -trustcacerts -alias wsm_certificate -file %CVP_HOME%\conf\security\<filename_of_your_signed_cert_from_CA>.
1. Enter the keystore password when prompted.
Step 12. Repeat Step 4 to 11 (root and intermediate certificates do not need to be imported twice), for Call Server and VXML Server certificates on the CVP Server and Call Server certificate on the Reporting Server.
Step 13 Configure WSM in CVP.
1. Navigate to c:\cisco\cvp\conf\jmx_wsm.conf.
Add or update the file as shown and save it:
javax.net.debug = all
com.sun.management.jmxremote.ssl.need.client.auth = true
com.sun.management.jmxremote.authenticate = false
com.sun.management.jmxremote.port = 2099
com.sun.management.jmxremote.ssl = true
com.sun.management.jmxremote.rmi.port = 3000
javax.net.ssl.keyStore=C:\Cisco\CVP\conf\security\.keystore
javax.net.ssl.keyStorePassword=< keystore_password >
javax.net.ssl.trustStore=C:\Cisco\CVP\conf\security\.keystore
javax.net.ssl.trustStorePassword=< keystore_password >
javax.net.ssl.trustStoreType=JCEKS
2. Run the regedit command.
Append this to the file at HKEY_LOCAL_MACHINE\SOFTWARE\Wow6432Node\Apache Software Foundation\Procrun 2.0\WebServicesManager\Parameters\Java:


Djavax.net.ssl.trustStore=C:\Cisco\CVP\conf\security\.keystore
Djavax.net.ssl.trustStorePassword=<keystore_password>
Djavax.net.ssl.trustStoreType=JCEKS
Step 14. Configure JMX of CVP Callserver in CVP Server and Reporting server.
1. Navigate to c:\cisco\cvp\conf\jmx_callserver.conf.
Update the file as shown and save it:
com.sun.management.jmxremote.ssl.need.client.auth = true
com.sun.management.jmxremote.authenticate = false
com.sun.management.jmxremote.port = 2098
com.sun.management.jmxremote.ssl = true
com.sun.management.jmxremote.rmi.port = 2097
javax.net.ssl.keyStore = C:\Cisco\CVP\conf\security\.keystore
javax.net.ssl.keyStorePassword = <keystore password>
javax.net.ssl.trustStore=C:\Cisco\CVP\conf\security\.keystore
javax.net.ssl.trustStorePassword=< keystore_password >
javax.net.ssl.trustStoreType=JCEKS
Step 15. Configure JMX of VXMLServer in CVP Server.
1. Navigate to c:\cisco\cvp\conf\jmx_vxml.conf.
Edit the file as shown and save it:
com.sun.management.jmxremote.ssl.need.client.auth = true
com.sun.management.jmxremote.authenticate = false
com.sun.management.jmxremote.port = 9696
com.sun.management.jmxremote.ssl = true
com.sun.management.jmxremote.rmi.port = 9697
javax.net.ssl.keyStore = C:\Cisco\CVP\conf\security\.keystore
javax.net.ssl.keyStorePassword = <keystore password>
2. Run the regedit command.
Append theese to the file at HKEY_LOCAL_MACHINE\SOFTWARE\Wow6432Node\Apache Software Foundation\Procrun 2.0\VXMLServer\Parameters\Java:


Djavax.net.ssl.trustStore=C:\Cisco\CVP\conf\security\.keystore
Djavax.net.ssl.trustStorePassword=<keystore_password>
Djavax.net.ssl.trustStoreType=JCEKS
3. Restart WSM service, Call Server and VXML Server services on CVP server and WSM Service and Call Server service on Reporting Server.
Note: When secure communication is enabled with JMX, it forces the keystore to be %CVP_HOME%\conf\security\.keystore, instead of %CVP_HOME%\jre\lib\security\cacerts.
Therefore, the certificates from %CVP_HOME%\jre\lib\security\cacerts should be imported to %CVP_HOME%\conf\security\.keystore.
Generate CA-Signed Client Certificate for WSM
Step 1. Log in to the CVP Server or Reporting Server. Retrieve the keystore password from the security.properties file.
Note: At the command prompt, enter more %CVP_HOME%\conf\security.properties. Security.keystorePW = <Returns the keystore password> Enter the keystore password when prompted.
Step 2. Navigate to %CVP_HOME%\conf\security and generate a CA-signed certificate for client authentication with callserver with this command.
%CVP_HOME%\jre\bin\keytool.exe -storetype JCEKS -keystore %CVP_HOME%\conf\security\.keystore -genkeypair -alias <CN of CVP Server or Reporting Server WSM certificate> -v -keysize 2048 -keyalg RSA
1. Enter the details at the prompts and type Yes to confirm.
2. Enter the keystore password when prompted.
Note: The alias will be the same as the CN used to generate WSM server certificate.
Step 3. Generate the certificate request for the alias with this command and saving it to a file (for example, jmx_client.csr).
%CVP_HOME%\jre\bin\keytool.exe -storetype JCEKS -keystore %CVP_HOME%\conf\security\.keystore -certreq -alias <CN of CVP Server or Reporting Server WSM certificate> -file %CVP_HOME%\conf\security\jmx_client.csr
1. Enter the keystore password when prompted.
2. Verify that the CSR was generated successfully with his command: dir jmx_client.csr.
Step 4. Sign the JMX Client Certificate on a CA.
Note: Follow the procedure to create a CA-signed certificate with the CA authority. Download the CA-signed JMX Client certificate (Root and intermediate certificates are not required since they were downloaded and imported previously).
1. Enter the keystore password when prompted.
2. At Trust this certificate prompt, type Yes.
Step 5. Copy the CA-signed JMX Client certificate to %CVP_HOME%\conf\security\.
Step 6. Import the CA-signed JMX Client certificate with this command.
%CVP_HOME%\jre\bin\keytool.exe -storetype JCEKS -keystore %CVP_HOME%\conf\security\.keystore -import -v -trustcacerts -alias <CN of CVP Server or Reporting Server WSM certificate> -file %CVP_HOME%\conf\security\<filename of CA-signed JMX Client certificate>
1. Enter the keystore password when prompted.
Step 7. Restart Cisco CVP Call Server, VXML Server, and WSM services.
Step 8. Repeat the same procedure for Reporting Server, if implemented.
Generate CA-Signed Client Certificate for OAMP (to be done on OAMP)
Step 1. Log in to the OAMP Server. Retrieve the keystore password from the security.properties file.
Note: At the command prompt, enter more %CVP_HOME%\conf\security.properties. Security.keystorePW = <Returns the keystore password> Enter the keystore password when prompted.
Step 2. Navigate to %CVP_HOME%\conf\security and generate a CA-signed certificate for client authentication with CVP Server WSM. Use this command.
%CVP_HOME%\jre\bin\keytool.exe -storetype JCEKS -keystore %CVP_HOME%\conf\security\.keystore -genkeypair -alias <CN of OAMP Server WSM certificate> -v -keysize 2048 -keyalg RSA.
1. Enter the details at the prompts and type Yes to confirm.
2. Enter the keystore password when prompted.
Step 3. Generate the certificate request for the alias with this command and save it to a file (for example, jmx.csr).
%CVP_HOME%\jre\bin\keytool.exe -storetype JCEKS -keystore %CVP_HOME%\conf\security\.keystore -certreq -alias <CN of CVP Server WSM certificate> -file %CVP_HOME%\conf\security\jmx.csr.
1. Enter the keystore password when prompted.
Step 4. Sign the certificate on a CA.
Note: Follow the procedure to create a CA-signed certificate using the CA authority. Download the certificate and the root certificate of the CA authority.
Step 5. Copy the root certificate and CA-signed JMX Client certificate to %CVP_HOME%\conf\security\.
Step 6. Import the root certificate of the CA. Use this command.
%CVP_HOME%\jre\bin\keytool.exe -storetype JCEKS -keystore %CVP_HOME%\conf\security\.keystore -import -v -trustcacerts -alias root -file %CVP_HOME%\conf\security\<filename_of_root_cert>.
1. Enter the keystore password when prompted.
2. At Trust this certificate prompt, type Yes.
Step 7. Import the CA-signed JMX Client certificate of CVP. Use this command.
%CVP_HOME%\jre\bin\keytool.exe -storetype JCEKS -keystore %CVP_HOME%\conf\security\.keystore -import -v -trustcacerts -alias <CN of Callserver WSM certificate> -file %CVP_HOME%\conf\security\<filename_of_your_signed_cert_from_CA>.
1. Enter the keystore password when prompted.
Step 8. Restart the OAMP service.
Step 9. Log in to OAMP. to enable secure communication between OAMP and Call Server or VXML Server. Navigate to Device Management > Call Server. Check the Enable secure communication with the Ops console check box. Save and deploy both Call Server and VXML Server.
Step 10. Run the regedit command.
Navigate to HKEY_LOCAL_MACHINE\SOFTWARE\Wow6432Node\Apache Software Foundation\Procrun 2.0\OPSConsoleServer\Parameters\Java.
Append this to the file and save it.
Djavax.net.ssl.trustStore=C:\Cisco\CVP\conf\security\.keystore
Djavax.net.ssl.trustStorePassword=<keystore_password>
Djavax.net.ssl.trustStoreType=JCEKS
Note: After you secure the ports for JMX, JConsole can be accessed only after you perform the defined steps for JConsole listed in the Oracle docs.
Related Information
Contributed by Cisco Engineers
- Ramiro AmayaCisco TAC
- Robert RogierCisco TAC
- Adithya UdupaCisco Engineering
 Feedback
Contact Cisco
- Open a Support Case

- (Requires a Cisco Service Contract)