CMX-Hochverfügbarkeit konfigurieren
Download-Optionen
-
ePub (267.0 KB)
In verschiedenen Apps auf iPhone, iPad, Android, Sony Reader oder Windows Phone anzeigen
Inklusive Sprache
In dem Dokumentationssatz für dieses Produkt wird die Verwendung inklusiver Sprache angestrebt. Für die Zwecke dieses Dokumentationssatzes wird Sprache als „inklusiv“ verstanden, wenn sie keine Diskriminierung aufgrund von Alter, körperlicher und/oder geistiger Behinderung, Geschlechtszugehörigkeit und -identität, ethnischer Identität, sexueller Orientierung, sozioökonomischem Status und Intersektionalität impliziert. Dennoch können in der Dokumentation stilistische Abweichungen von diesem Bemühen auftreten, wenn Text verwendet wird, der in Benutzeroberflächen der Produktsoftware fest codiert ist, auf RFP-Dokumentation basiert oder von einem genannten Drittanbieterprodukt verwendet wird. Hier erfahren Sie mehr darüber, wie Cisco inklusive Sprache verwendet.
Informationen zu dieser Übersetzung
Cisco hat dieses Dokument maschinell übersetzen und von einem menschlichen Übersetzer editieren und korrigieren lassen, um unseren Benutzern auf der ganzen Welt Support-Inhalte in ihrer eigenen Sprache zu bieten. Bitte beachten Sie, dass selbst die beste maschinelle Übersetzung nicht so genau ist wie eine von einem professionellen Übersetzer angefertigte. Cisco Systems, Inc. übernimmt keine Haftung für die Richtigkeit dieser Übersetzungen und empfiehlt, immer das englische Originaldokument (siehe bereitgestellter Link) heranzuziehen.
Inhalt
Einleitung
Dieses Dokument beschreibt die Grundlagen von Cisco Connected Mobile Experiences (CMX) und dessen Konfiguration. Es wird erläutert, wie Hochverfügbarkeit aktiviert, Wireless LAN Controller (WLC) hinzugefügt und einige Tests durchgeführt werden, die bei der Verifizierung der Hochverfügbarkeitskonfiguration mit Failover/Failback helfen.
Voraussetzungen
Anforderungen
Cisco empfiehlt, dass Sie über Kenntnisse in folgenden Bereichen verfügen:
- CMX
- Cisco WLC
Anmerkung: HA hat keine eindeutigen Anforderungen für die Wireless LAN-Controller.
Verwendete Komponenten
Die Informationen in diesem Dokument basierend auf folgenden Software- und Hardware-Versionen:
- CMX 10.6
- WLC 8.3
Die Informationen in diesem Dokument beziehen sich auf Geräte in einer speziell eingerichteten Testumgebung. Alle Geräte, die in diesem Dokument benutzt wurden, begannen mit einer gelöschten (Nichterfüllungs) Konfiguration. Wenn Ihr Netzwerk in Betrieb ist, stellen Sie sicher, dass Sie die potenziellen Auswirkungen eines Befehls verstehen.
Architektur
Die zentrale Komponente eines HA-Systems ist der Health Monitor. Er konfiguriert, verwaltet und überwacht die HA-Konfiguration. Der Hauptmodus zur Aufrechterhaltung der Vigil ist durch Heartbeats zwischen dem primären und sekundären Modus. Der Health Monitor ist für die Einrichtung von Datenbanken (DBs) und die Dateireplikation und die anschließende Überwachung der Anwendung verantwortlich. CMX unter dem HA-Paradigma kann als primär oder sekundär definiert werden. Die Kommunikation mit der Außenwelt (Network Mobility Services Protocol (NMSP) und API-Anrufe von Drittanbieterendgeräten und Prime Infrastructure (PI) erfolgt über eine virtuelle IP-Adresse. Wenn also das primäre und das sekundäre Gerät die Kontrolle übernimmt, wird die virtuelle IP transparent umgeschaltet.
Im Design ist eine Benutzeroberfläche (User Interface, UI) vorgesehen, um die HA-Paare zu konfigurieren und zu überwachen. Alarme werden für CMX und außerhalb von CMX generiert.
Die DBs gelten als der Kern des Systems, der immer in Echtzeit ohne Datenverlust repliziert werden muss. Die Anwendungsdaten außerhalb der DB sind wichtig, müssen aber nicht in Echtzeit synchronisiert werden und führen nicht zu Funktionsverlusten.
Netzwerkinfrastruktur
Das primäre und das sekundäre System müssen zwischen den einzelnen Systemen erreichbar sein. Sowohl das primäre als auch das sekundäre Subnetz müssen sich im gleichen Subnetz befinden. Dies ist erforderlich, damit die verwendete virtuelle IP-Adresse auf eines der Systeme umgeschaltet werden kann. Alle Einheiten, z. B. Wireless LAN Controller, die vom primären Gerät aus erreichbar sind, müssen auch vom sekundären Gerät aus erreichbar sein. Damit die sekundäre Synchronisierung und das Failover ordnungsgemäß funktionieren, sollte die Netzwerkinfrastruktur den Datenverkehr dieser Ports zwischen dem primären und sekundären Port ermöglichen. Die Ports werden in CMX geöffnet, aber die Firewalls in CMX ermöglichen es nur den anderen Peer-Systemen, Datenverkehr über diese Ports zu senden.
| Ports |
Beschreibung |
| 6378, 6379, 6380, 6381, 6382, 6383, 6385, 16378, 16379, 16380, 16381, 16 382, 16383, 16385 |
Redis |
| 7000, 7001, 9042 |
Cassandra-Datenbank |
| 5432 |
Postgres-Datenbank |
| 4242 |
REST- und Webservice mit hoher Verfügbarkeit |
| 22 |
SSH-Port und zum Synchronisieren von Dateien zwischen Servern |
Virtuelle IP
Wenn das HA-System eingerichtet ist, müssen die Benutzer nach einem Failover zur neuen CMX-Instanz umgeleitet werden, die auf der zweiten Instanz ausgeführt wird. Um das Failover aus Sicht der Netzwerkverbindungen transparent zu halten, wird das Konzept von Virtual IP (VIP) verwendet. Wenn sich sowohl das primäre als auch das sekundäre Subnetz im selben Subnetz befinden, wird eine VIP-Adressenzuordnung verwendet. In dieser Konfiguration sind externe Systeme einem VIP ausgesetzt. Dieses VIP ist der echten IP-Adresse des aktiven primären CMX zugeordnet. Bei einem Failover wird das VIP der Adresse des sekundären CMX neu zugeordnet. All dies geschieht automatisch ohne menschliches Eingreifen.
Die Verwendung einer virtuellen IP ist nicht obligatorisch. Wenn Sie CMX Layer 3 High Availability (d. h. die beiden Server in unterschiedlichen Subnetzen) verwenden, können Sie keine virtuelle IP verwenden. Die virtuelle IP bietet eine eindeutige IP für den IT-Administrator (oder Prime Infrastructure/Cisco DNA Center), um CMX unabhängig von Failover oder Failback zu verwalten. Die WLCs verfügen jedoch nur über einen NMSP-Tunnel zur derzeit aktiven physischen CMX-IP-Adresse.
Schritt 1: Installation der Webschnittstelle
Primäre Installation:
Installieren Sie CMX normal mit Anmeldung unter https://cmx_ip_address:1984/. Wählen Sie im Webinstallationsprogramm den Knotentyp Presence oder Location aus. Für diese Art der Installation muss der Knotentyp nicht als primär angegeben werden. Dies wird als eigenständiger Server betrachtet, der als primärer Server ausgeführt werden kann, wie im Bild gezeigt.
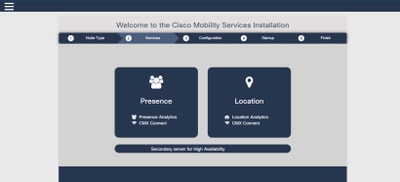
Sekundäre Installation:
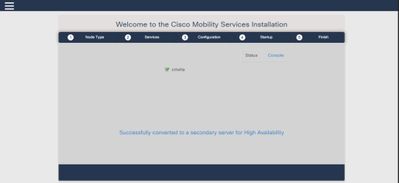
Installieren Sie CMX (https://cmx_ip_address:1984/) wie gewohnt, bis der Knotentyp im Webinstallationsprogramm ausgewählt werden muss. Eine dritte Option ist für sekundäre Geräte vorgesehen. Wenn Sie diese Option auswählen, wird das System als sekundäres System konfiguriert und stellt eine Verbindung zur CMX High Availability Admin-Schnittstelle bereit.
Die CMX High Availability Admin-Webschnittstelle wird auf dem CMX-Port 4242 ausgeführt und kann wie folgt aufgerufen werden: https://cmx_ip_address:4242/ Melden Sie sich mit der userid cmxadmin und dem Kennwort, das die cmxadmin-Benutzer-ID zum Zeitpunkt der Installation konfiguriert hat, bei der HA-Webschnittstelle an. Nach der Anmeldung verfügt die Benutzeroberfläche über Status- und Konfigurationsinformationen. Die Rolle wird als sekundär für das System angezeigt.
Schritt 2: HA aktivieren
HA kann jetzt aktiviert werden, nachdem die primären und sekundären Server vorbereitet wurden. Die HA-Funktion kann in der CMX-Webschnittstelle oder in der CMX-Befehlszeile aktiviert werden. Dies sind die Optionen, die zum Einrichten von HA erforderlich sind:
- Sekundäre IP-Adresse
- Sekundäres Kennwort: Kennwort für das cmxadmin-Konto auf dem Sekundärserver
- VIP-Adresse: Vom aktiven Server zu verwendende VIP-Adresse
- Failover-Typ: Auto Failover ermöglicht CMX ein automatisches Failover auf den sekundären Server, wenn ein schwerwiegendes Problem erkannt wird. Für eine manuelle Ausfallsicherung muss der Benutzer das Failover von der Webschnittstelle oder der Befehlszeile aus initiieren. Der Ausfall wird dem Benutzer über Benachrichtigungen gemeldet, aber es wird kein manueller Failover durchgeführt.
- Benachrichtigungs-E-Mail-Adresse: E-Mail-Adresse, um Benachrichtigungen über HA-Informationen oder Probleme zu senden. Die für HA verwendeten E-Mail-Einstellungen entsprechen denen von CMX. Dieses Feld ist erforderlich, obwohl Sie keinen E-Mail-Server konfiguriert haben. Wenn Sie keine E-Mail-Benachrichtigungen verwenden möchten, geben Sie bitte eine Dummy-E-Mail-Adresse ein, und klicken Sie auf "Aktivieren".
Konfigurieren von HA Web:
Navigieren Sie in CMX zur Registerkarte System, und klicken Sie auf das Symbol Einstellungen. Daraufhin wird ein modaler Dialog mit verschiedenen Einstellungen in CMX angezeigt. Wählen Sie die Option HA aus, um die Optionen anzuzeigen, die zum Aktivieren von HA erforderlich sind. Benachrichtigungs-E-Mail-Adresse Sie können angeben, wo Sie Benachrichtigungen erhalten möchten.
Klicken Sie auf die Schaltfläche Aktivieren, wenn alle Optionen bereitgestellt sind, um HA zu aktivieren.

CMX überprüft die HA-Einstellungen und aktiviert die HA-Funktion zwischen Primär und Sekundär. Die WebUI kehrt zurück, wenn die Konfiguration erfolgreich gestartet wurde.
Überprüfen Sie auf der Einstellungsseite von CMX, ob die Einstellungen korrekt sind und ob die Synchronisierung durchgeführt wird. Wenn es keine solche Tabelle gibt und wenn Sie zum Abschnitt HA-Einstellungen zurückkehren, alle Konfigurationsfelder leer sind, waren die Informationen falsch oder falsch.

Die HA-Aktivierung ist jedoch nicht abgeschlossen. Die erstmalige Synchronisierung aller Daten zwischen dem primären und dem sekundären Server kann sehr viel Zeit in Anspruch nehmen. Die Benutzeroberfläche zeigt während der Synchronisierung den Status als Primary Syncing (Primäre Synchronisierung) an.
Wenn die Synchronisierung erfolgreich abgeschlossen wurde, wechselt der Server auf dem primären Server in den Status Primary Active (Primärer aktiver Server).
Nach Abschluss dieses Vorgangs wird in CMX eine Informationswarnung generiert. Darüber hinaus wird eine E-Mail-Benachrichtigung gesendet, die anzeigt, dass das System aktiv ist und korrekt synchronisiert wird.
Hochverfügbarkeits-CLI aktivieren (als Referenz):

Schritt 3: Cisco WLC zu CMX hinzufügen
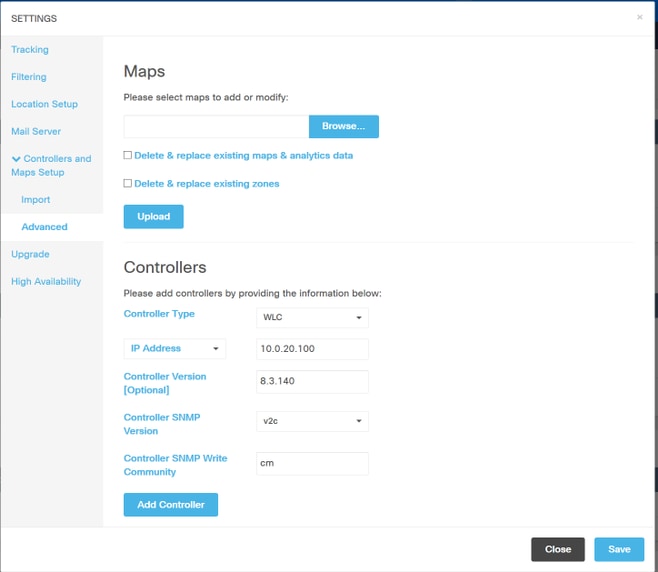
Sie können Cisco WLCs mithilfe der CLI oder der CMX-Benutzeroberfläche oder mithilfe der Prime-Infrastruktur hinzufügen. Für diese Übung können Sie die CMX-Webbenutzeroberfläche direkt hinzufügen.
Die Controller-Konfiguration funktioniert nur, wenn die NMSP-Verbindung richtig ist. Der Controller kann zwar erfolgreich hinzugefügt werden, die Verbindung funktioniert jedoch möglicherweise nicht.
Navigieren Sie zum primären CMX-Server https://cmx_ip_address/. Klicken Sie auf die Registerkarte System > Einstellungs-Symbol > Linkes Menü.
Nachdem Sie Cisco WLCs hinzugefügt haben, müssen Sie überprüfen, ob der Controller-Status aktiv ist.
Um den Controller-Status mithilfe der Benutzeroberfläche zu überprüfen, müssen Sie zur Registerkarte System navigieren. Die Controller-Liste wird auf der Registerkarte angezeigt, und der neue Controller sollte grün angezeigt werden.
Schritt 4: Failover
Der Failover-Prozess beinhaltet die Übertragung von Vorgängen auf das sekundäre CMX, falls das primäre System ausfällt. Ein Failover kann automatisch erfolgen, wenn CMX ein Problem mit dem primären Server erkennt. Ein Failover kann manuell von einem Benutzer in der Web-Benutzeroberfläche oder in der Befehlszeile durchgeführt werden. Der Failover-Status kann anhand des aktuellen Status jedes Systems überwacht werden.
Der Failover-Prozess kann vom Benutzer manuell initiiert werden. Das Failover kann über die CMX High Availability-Webschnittstelle oder die CMX-Befehlszeile durchgeführt werden.
Web für manuelle Failover-Ausfallsicherung:
Melden Sie sich bei der CMX HA-Webschnittstelle auf dem primären oder sekundären (https://server_ip:4242) an. Die Seite "Monitor" verfügt über eine Schaltfläche mit der Bezeichnung Failover, wenn die Server aktiv synchronisieren. Aktivieren Sie am rechten oberen Rand die automatische Aktualisierung.

Manuelle Failover-CLI (als Referenz):

Schritt 5: Fehler
Die Ausführung von CMX auf dem sekundären Gerät sollte als vorübergehende Situation angesehen werden, bis die Ursache für den primären Ausfall ermittelt wurde. Wenn das primäre Feld wiederhergestellt ist (oder eine neue Box bereitgestellt wird), sollte der Failback-Prozess initiiert werden. Die andere Option besteht darin, das System in einen Primärserver umzuwandeln und das andere System in einen sekundären Server umzuwandeln. In beiden Fällen sollte so schnell wie möglich ein Server verfügbar gemacht werden, da HA nicht mehr mit einem sekundären Server synchronisiert wird.
Der Failback-Prozess muss manuell vom Benutzer ausgeführt werden. Das Failback kann über die CMX HA-Webschnittstelle oder die CMX-Befehlszeile erfolgen.
Web für manuelle Fehlerbehebung:
Melden Sie sich bei der CMX HA-Webschnittstelle auf dem primären oder sekundären (https://server_ip:4242) an. Die Seite "Monitor" verfügt über eine Schaltfläche mit der Bezeichnung Failback (Fehler), wenn beide Server anzeigen, dass ein Failover aktiv ist.

GUI für manuelles Failback:

Schritt 6: Upgrade/Deaktivieren von HA
Im aktuellen CMX-Format müssen Sie HA deaktivieren, um ein Upgrade durchzuführen. Um HA über die Befehlszeile zu deaktivieren, führen Sie cmxha config disable im primären CMX aus.

Wenn Sie vergessen, die HA-Stufe vor einem Upgrade zu brechen, wird Sie das Upgrade-Skript daran erinnern. Sie müssen den sekundären CMX-Server separat aktualisieren, bevor Sie HA reformieren können.
Überprüfung
Für diese Konfiguration ist derzeit kein Überprüfungsverfahren verfügbar.
Fehlerbehebung
Dieser Abschnitt enthält Informationen, die Sie zur Fehlerbehebung bei Ihrer Konfiguration verwenden können.
HA hat Online-Hilfe für die Funktion. Die Hilfe ist vollständig und bietet einen Überblick sowie weitere Details zu dieser Funktion. Sie können sie hier aufrufen: https://cmx_ip_address:4242/help
Befehlsreferenz für CMX HA: https://www.cisco.com/c/en/us/td/docs/wireless/mse/10-3/cmx_command/cmxcli103/cmxcli10-3_chapter_010.pdf
Paketdateien, die aus dem TAR-Protokoll überprüft werden sollen:
- cmx-hafile-sync
- cmx-haweb-service
- cmx-haserver
Revisionsverlauf
| Überarbeitung | Veröffentlichungsdatum | Kommentare |
|---|---|---|
1.0 |
07-Sep-2018 |
Erstveröffentlichung |
Beiträge von Cisco Ingenieuren
- Jimit DalalWireless-Technik
- Nicolas DarchisCisco TAC
 Feedback
Cisco kontaktieren
- Eine Supportanfrage öffnen

- (Erfordert einen Cisco Servicevertrag)